
[ad_1]
This post will walk you through the steps of turning two or more routers into a well-performing and seamless Asus AiMesh setup. You’ll also find some tricks for better roaming.
It’s part of my series on Asus’s AiMesh, which has been a popular way to build a robust home Wi-Fi mesh system in the past few years. That said, make sure you check the related box below if you have any AiMesh-related questions.
Dong’s note: This post was once part of the overview piece on AiMesh, and I moved it out on February 11, 2022, to clarify the topics and add more up-to-date information. On July 4, 2022, I updated it with more detailed steps and relevant information.
Getting an AiMesh system of your own: The hardware arrangement
You need at least two routers to create an AiMesh system. No matter what combo you get, which I detailed in this post for a sub-Gigabit network, the setup process is generally the same, and chances are the mesh will work — it’s a matter of degrees.
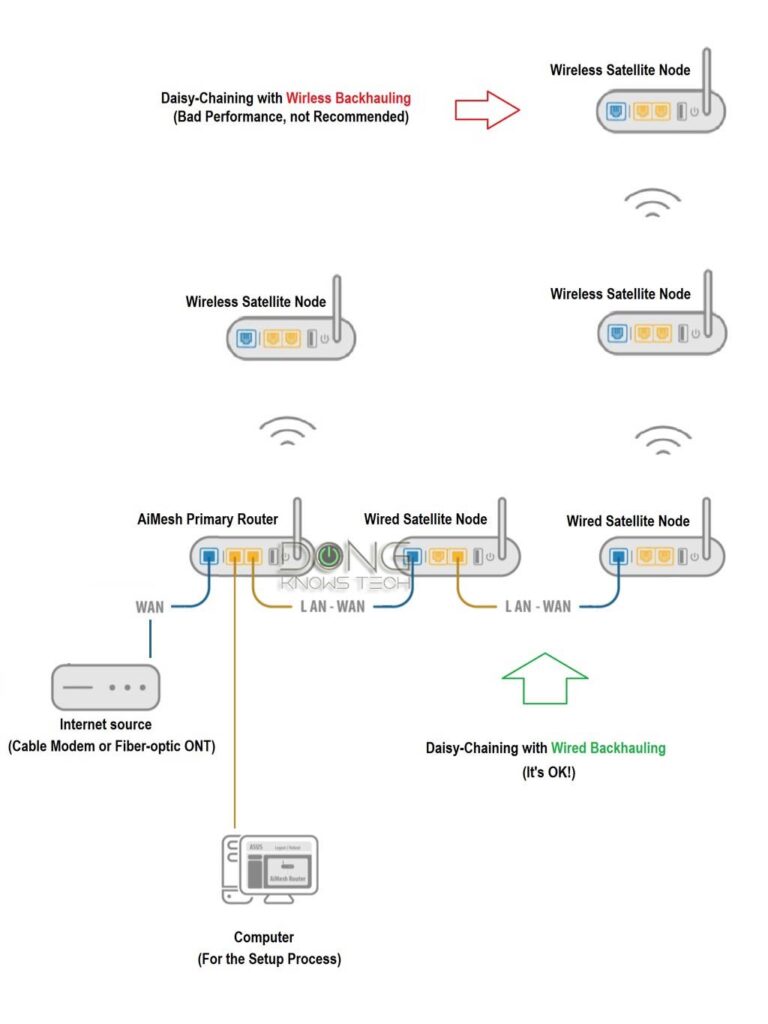
Generally, here’s the diagram in hardware arrangement:
Internet source -> Primary AiMesh router -> AiMesh satellite nodes.
Specifically, you connect the primary router’s WAN port to your Internet terminal device, generally, that’s a Cable modem or a fiber ONT. After that, add your AiMesh satellite to the router.
This is always the case in a wireless setup since the satellite connects to the primary router’s Wi-Fi network.
In a wired backhaul setup — that’s when you use network cables to link them — things need to be a bit more specific.
AiMesh with wired backhaul: How to connect the hardware units
Current AiMesh Wi-Fi hardware
This portion of extra content is part of the original post on the AiMesh feature as a whole. It’s updated each time this website covers an additional Asus router.
Wi-Fi 5 (802.11ac) AiMesh broadcasters
Most of these are legacy broadcasters that might not support the latest version of AiMesh.
- Tri-band: GT-AC5300, RT-AC5300, Lyra, and ZenWiFi AC.
- Dual-band: RP-AC1900, RT-AC1900, RT-AC1900P/U, RT-AC2900, RT-AC3100, RT-AC5300, RT-AC68P/R/RW/U/UF/W, GT-AC2600, Lyra Trio, Blue Cave, RT-AC86U, RT-AC88U, and possibly more.
Wi-Fi 6/6E (802.11ax) AiMesh broadcasters
These non-complete lists only include the latest broadcasters already covered on this website.
- Tri-band (Wi-Fi 6 and Wi-Fi 6E):
- Dual-band (Wi-Fi 6): RT-AX88U, RT-AX89X, RT-AX3000 / RT-AX58U, RT-AX56U, ZenWiFi XD4, RT-AX86U, RT-AX82U, RT-AX68U, RP-AX56, GS-AX3000, GS-AX5400, ZenWiFi XD6, GT-AX6000, ZenWiFi AX Hybrid XP4, and more.
When you choose to use wired backhauling, there are two scenarios.
Standard scenario: Primary AiMesh router + AiMesh wired satellite nodes.
This configuration is generally recommended, and it works the best.
In this case, the way you link the hardware units together follows the same rules as that of a standard router, specifically:
- The router unit must be in your local network’s frontmost position, with the rest of the nodes behind it.
- Use a node’s WAN port to connect it to the existing network, namely a LAN port on the router, a switch, or another node.
In other words, the satellite units have to be at least one level behind the router unit.
So let’s say you have a mesh of one primary router and two nodes. Here’s how you’d use network cables to link them up:
- Hook the router’s WAN port to the Internet source (modem/ONT/gateway).
- Connect the nodes to the router by:
- Link each node’s WAN port to a LAN port of the router. OR
- Connect the first node’s WAN port to the router’s LAN port, then connect the 2nd node’s WAN port to the 1st node’s LAN port. Or
- Place a switch (or two) in between them. This switch can be between the router and the node(s) or between the nodes themselves. But it also must be behind the router — or on top of the router, depending on your imagination.
- Now let the router works as an AiMesh router mode (default).
In a fully wired backhaul setup, you should explicitly use Ethernet Backhaul Mode via the AiMesh section of the router’s web interface — detail steps below.
If the Internet source is a gateway, you also can change the AiMesh router and, therefore, the entire system to work in the Access Point mode. That brings us to the second scenario.
Mesh system in AP mode scenario: Existing (non-AiMesh router) + AiMesh wired satellite nodes
This configuration applies to the situation where you already have an existing router (like an ISP-provided gateway) and want to avoid double-NAT.
In this case, you can arrange the hardware the same as the standard configuration above. Or you can also connect each AiMesh satellite directly to the existing router. In other words, all AiMesh units can be at the same level.
So let’s say you have an existing gateway and three AiMesh nodes. You first set up the AiMesh system the standard way, with double NAT. After that, from within the web interface of the primary unit, change the mesh into the AP mode.
Now you also have the option of connecting all three units’ WAN ports to the existing gateway (or a switch.) It might work better for certain wiring situations where you can’t put the satellite behind the main unit.
This configuration is also an option to build a Multi-Gig wired AiMesh system of mixed Dual-band and Tri-band hardware — more here.
Standard access point scenario: AiMesh router(s) in the AP mode
In a wired home, you also have the option of using each AiMesh node in the Access Point mode — it’s now no longer an AiMesh node but just a regular access point.
Specifically, you use each of the satellites as an individual AP — not to be confused with the AP mode of the entire system as mentioned above.
In this case, you don’t have a true mesh system since you’ll have to manage the node separately using its web interface. Specifically, if you change the Wi-Fi name and password on the router, that won’t be replicated to the satellites automatically.
The signal hand-off is probably not working very well, either, if at all. And keep in mind that the hardware loses all of its features and settings available in the router roles.
But in return, you can rest assured that any hardware combo will work, and you can directly control the AP’s USB port and its Wi-Fi bands. Moreover, you can also use non-AiMesh routers, including those from a different hardware vendor.
Using the satellite units in the AP role, which is wired, is far more reliable than using them as wireless AiMesh nodes in my trial. So, consider this as an alternative when you have issues with a pure AiMesh setup.
With that out of the way, let’s find out how to build an AiMesh system in detail.
Asus AiMesh Setup: The step-by-step guide
Generally, AiMesh comes in different flavors. Here are a few things to keep in mind:
- If you get a ZenWiFi set, chances are the hardware units are pre-synced. Consequently, you only need to set up the router unit the way you do any standard router, and your mesh is ready — you won’t need to add the other units manually.
- If you get multiple stand-alone routers, or if you use ZenWiFi hardware of different sets, the process is the same.
- If you use a standalone router as the main unit and a ZenWiFi mesh set as satellite nodes. Keep in mind that you need to add one satellite unit at a time and make sure the other satellite(s) are turned off during the process.
With that out of the way, below are steps on getting your own AiMesh setup, no matter what hardware combo you use.
As a rule, I’d recommend the web user interface for these steps. While the Asus Router mobile app is helpful, it might create inconsistency in the setup process.
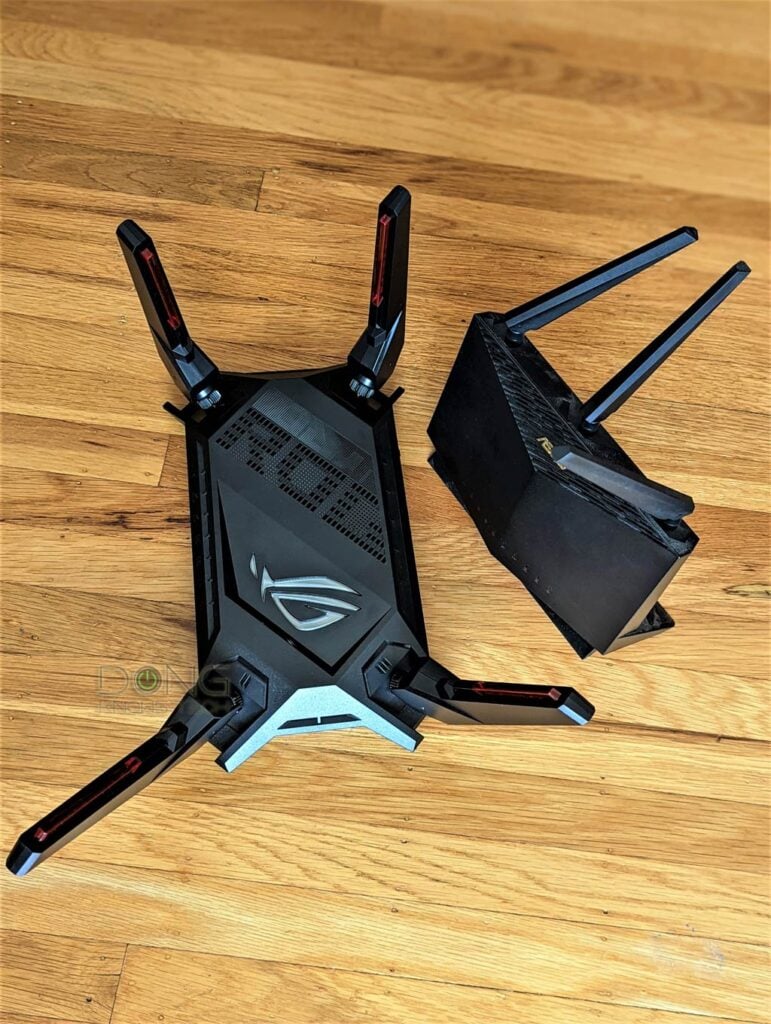
There are three main steps in setting up an AiMesh system. By the way, for this post, I use the GT-AX6000 as the primary router and a few others as satellite nodes. However, if you use any other combo, the process is the same.
A. Set up the main router
These steps apply when you set up a home network from scratch. If you’re already using an AiMesh-enabled router, you can jump to step #2.
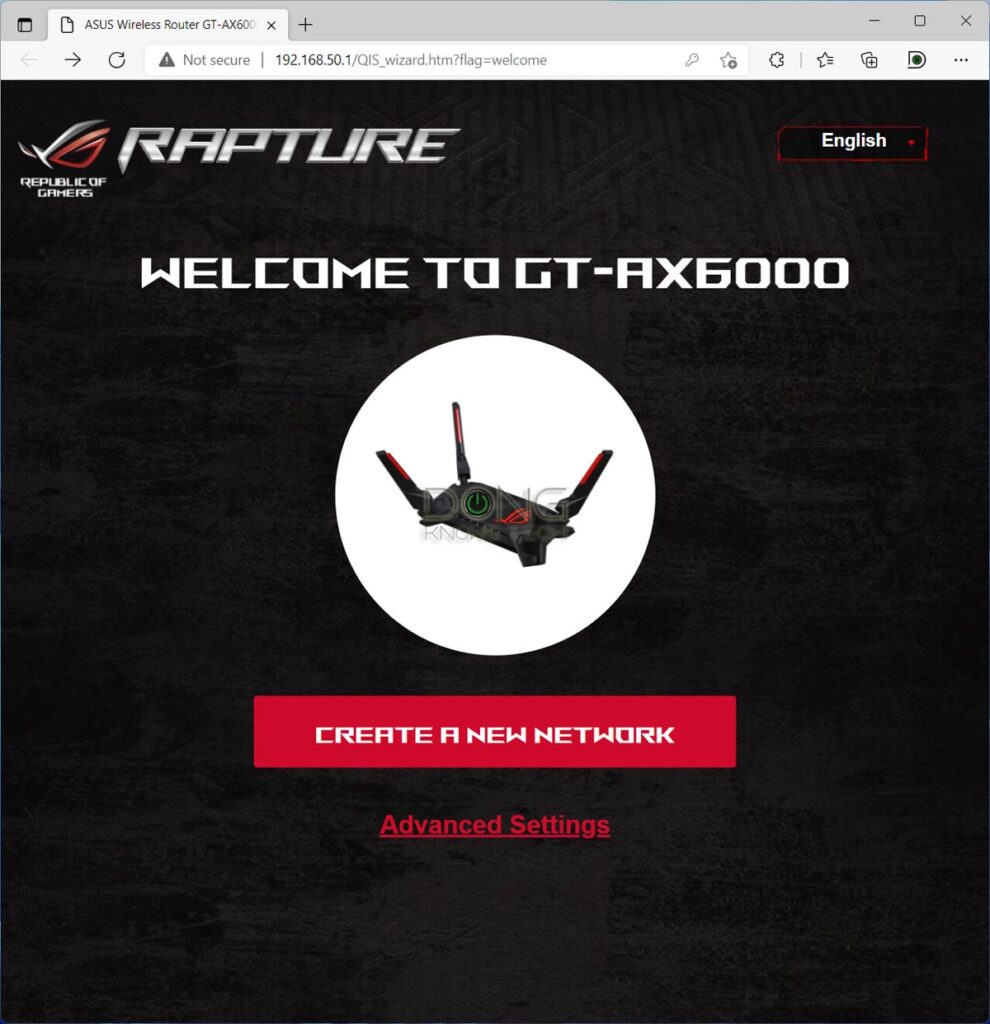
Create a new network: Pick this option to set up the device as a standalone router.
Advanced Settings: This option lets you choose different roles, including picking its role as an AiMesh router or satellite node. You can also upload the backup settings of a different router.
Again, you can set up an Asus router the way you do any standard router with a web user interface. Here are the general steps:
- Connect the router’s WAN port to the Internet source, be it a modem or a Fiber ONT.
- Connect the computer to the router’s LAN port, or its default Wi-Fi open network which is “ASUS_xx”.
- On the connected computer, launch a browser (Chrome, Firefox, or Edge) and navigate to the router’s default IP address which is 192.168.50.1 or router.asus.com.
- Follow the onscreen wizard to set up the router as a standalone router, or you can pick the AiMesh router role — the two are the same.
B. Prepare the satellite node unit(s)
- Reset: If you use a relatively new Wi-Fi 6 router, all you have to do is reset it to the default setting, which is already the case if you get a brand-new unit.
- Firmware update: In some cases, you might want to update the firmware first, which is especially helpful if you’re using a Wi-Fi 5 router, such as the Blue Cave, or RT-AC86U — their initial firmware might not even support AiMesh fully if at all. In this case, you can do that via the web user interface. When you’re done, you might want to run through the setup steps above, starting with A.2, and put the router in the AiMesh node role.
- Placement: Plug the node or nodes into power and place them some 10 feet (3m) from the main router (*).
Again, as mentioned above, if you use a ZenWiFi pack as nodes, make sure you add one hardware unit at a time, with the other being turned off.
C. Adding a satellite node to the main router to form the mesh
This step is entirely on the router unit’s web interface.
Important note: When applicable, make sure you get the main router out of the Ethernet Backhaul Mode for this step. You can put it back in this mode after you’ve added all nodes.
1. Search for satellite node(s)
On a connected computer, navigate to the main router’s web interface — as shown in step A.3 above.
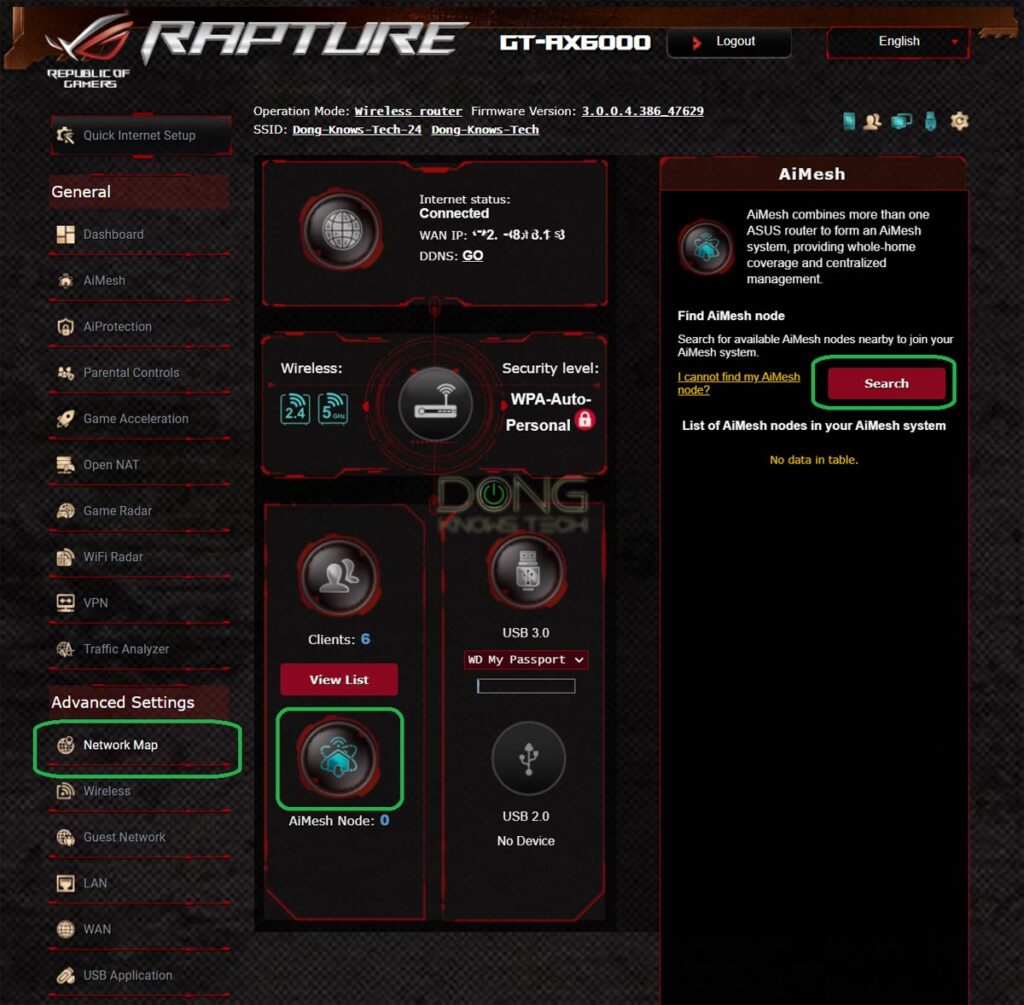
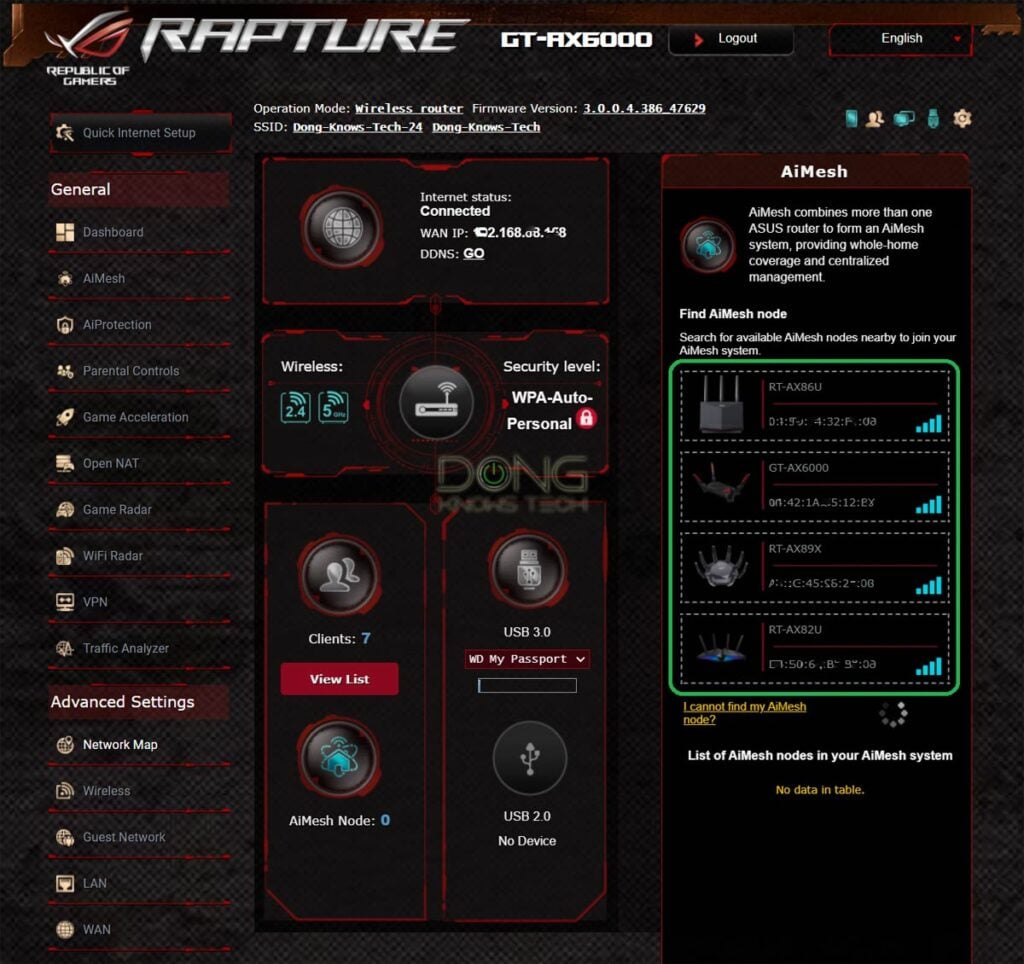
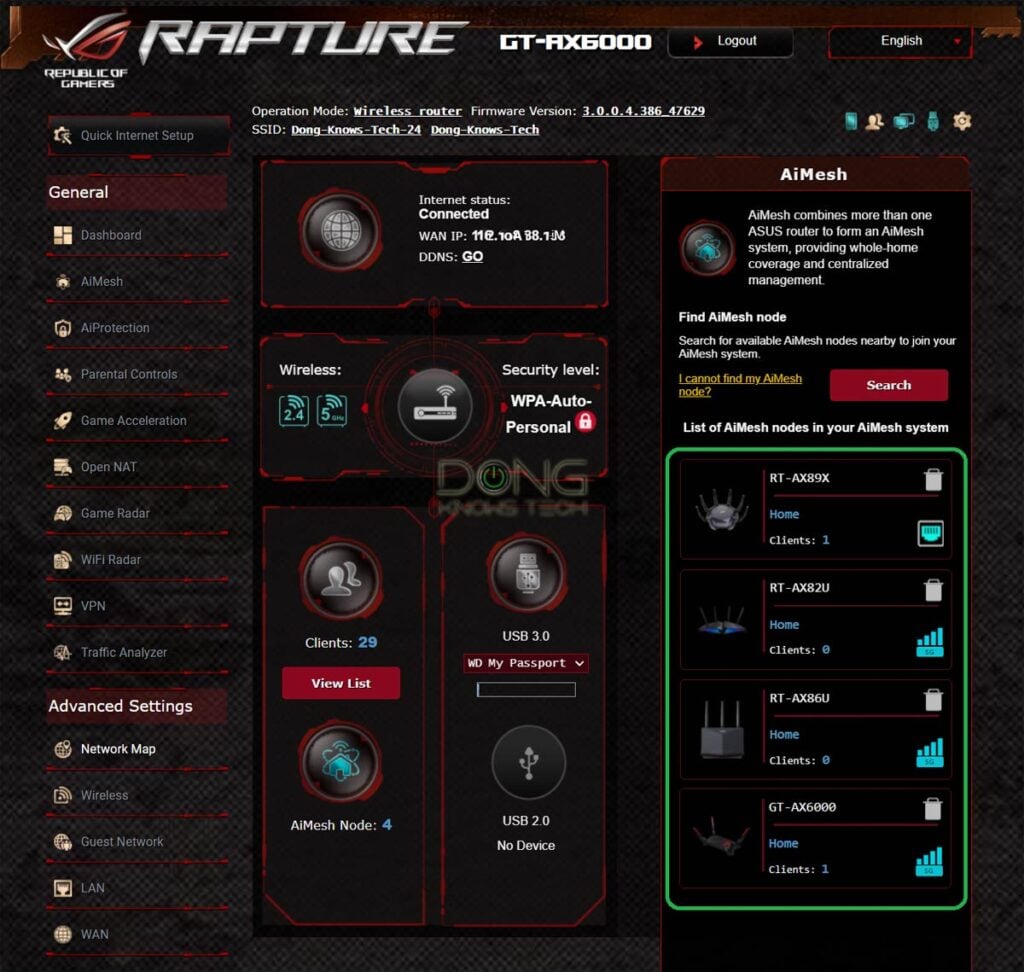
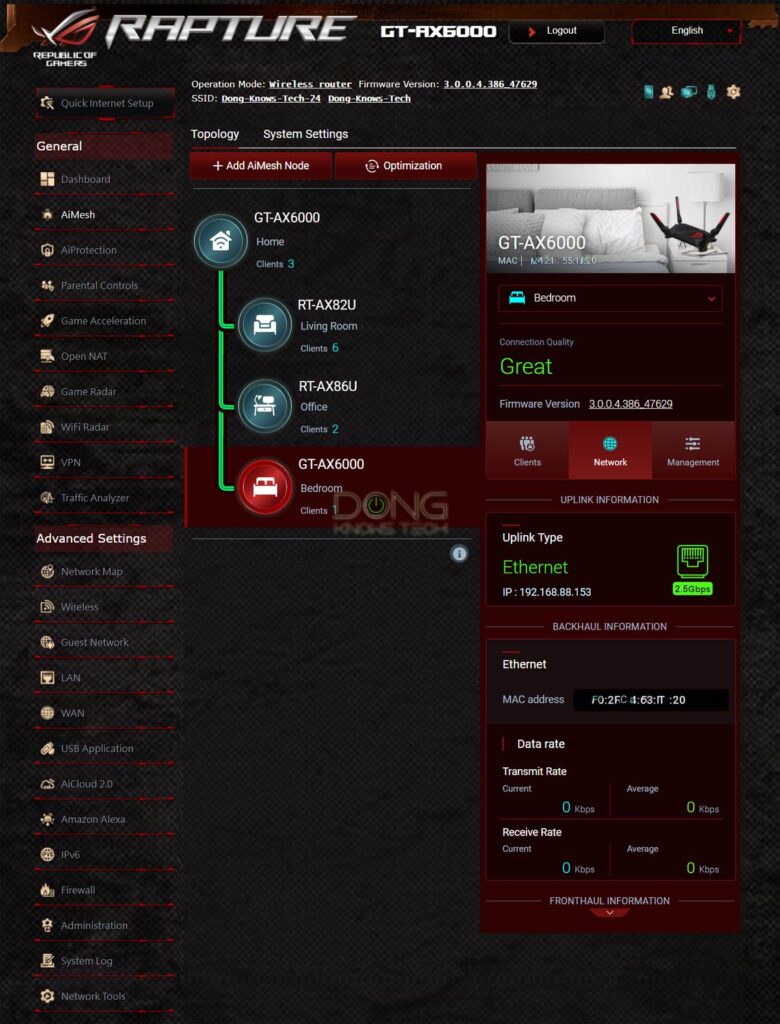
Click on Network Map on the menu, then on the AiMesh icon. Now click on Search. After a few seconds, the node(s) will appear, as shown in the screenshot below.
(Alternatively, you can use the AiMesh section of the interface, but in my experience, using the network map is much better and more consistent.)
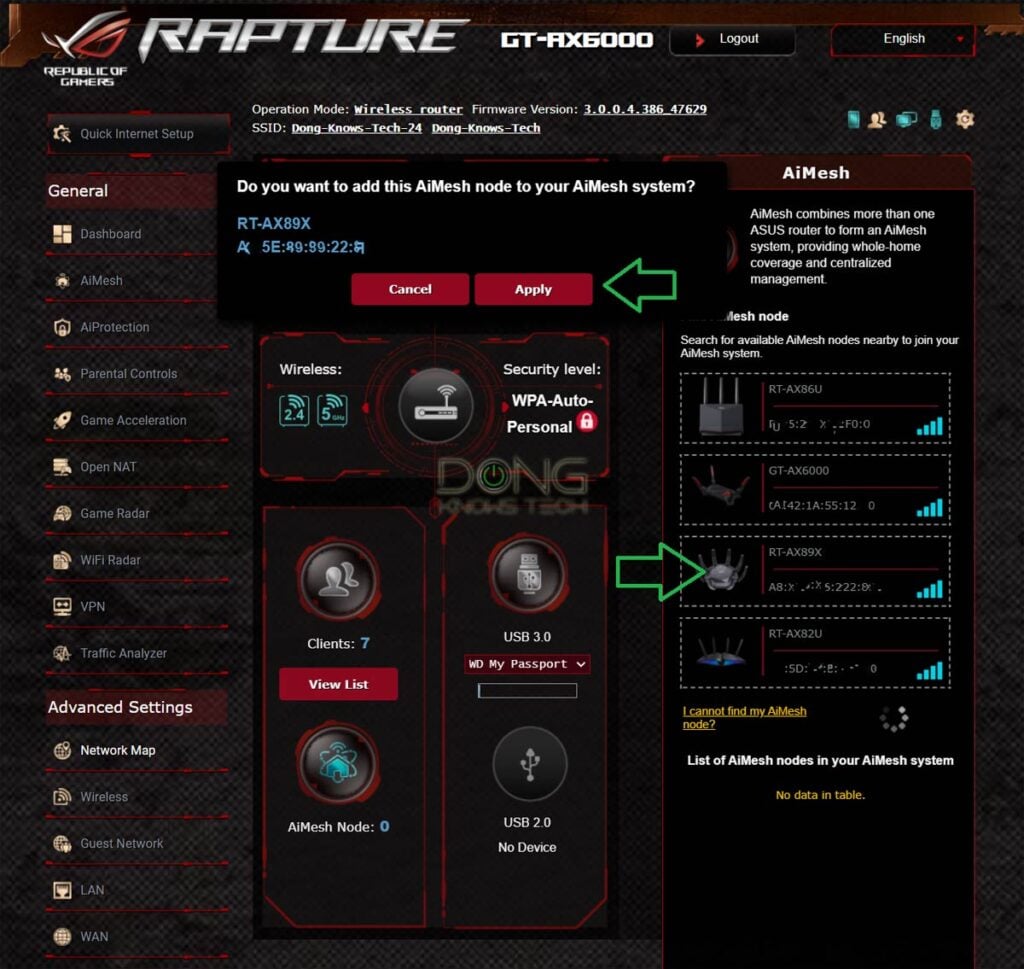
2. Add a satellite node to the mesh
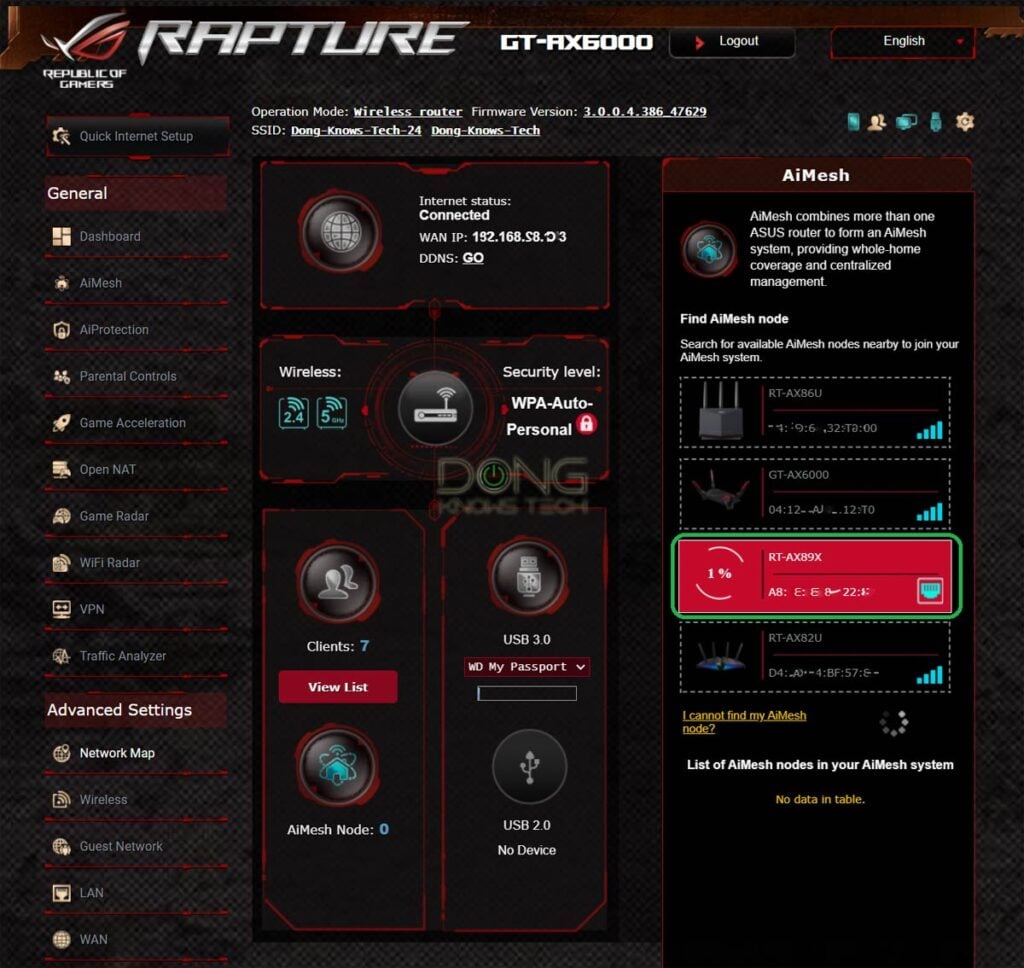
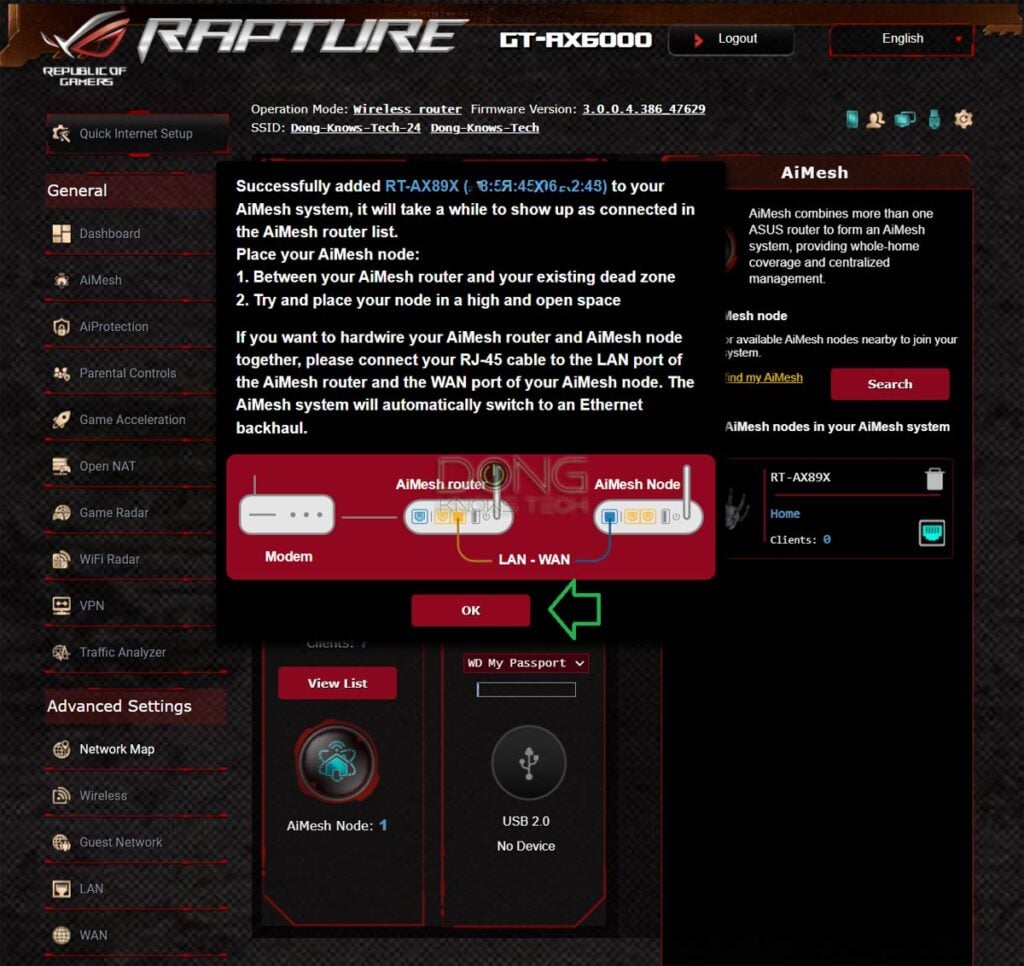
Click on a node and a pop-up prompt will appear. Click on Apply to confirm. Now, wait about a minute for the adding process to complete. This step’s progress is in the three screenshots below.
Note: During this time, in my experience, you must not navigate to a different part of the web interface. Doing so might cause the setup to fail, and you’ll need to try again from step #2.
And that’s it! Repeat from step #1 to add more nodes if need be. Otherwise, mission accomplished. All you have to do now is place the satellite(s) around the house strategically for the best coverage.
3. Rearange the hardware
Once you’ve gotten all satellite nodes added to the main router, it’s time the rearrange the hardware accordingly.
Specifically:
If a wireless setup, make sure the satellites are placed around the main router.
In a wired backhauling setup, connect the hardware to the network accordingly. Generally, you want to use the WAN port of the satellite to hook it to the existing network, either to the router’s LAN port or to a switch that connects to the router. You can also daisy-chain the nodes.
In a mix of wired and wireless backhauling setups, it’s best to have the wireless satellites connected directly to a router or a wired satellite.
After that, you might want to manage them properly, too.
AiMesh setup: Satellite management
Once you’ve gotten your system up and running, AiMesh has a lot of ways for users to manged the satellite nodes. Following are though you’ll find handy.
Let’s start with what folks care about the most: Keeping the devices connected to the closest (strongest) node, or Roaming Assistance.
How to set up roaming assistance in an AiMesh setup
As we move around the house, we generally want our phone (or laptop) to automatically connect to the closest Wi-Fi broadcaster to get the best connection speed, instead of to the one that’s farther away.
Generally, that’s called hand-off or seamless hand-off in a mesh Wi-Fi system. With AiMesh, that’s called roaming assistance.
Before continuing, remember that signal hand-off is complicated and almost always hit or miss, as I detailed in this mesh explainer.
Another thing is most of the time, the default hand-off settings will work out, and most canned systems don’t even allow you to change the settings at all.
So, having the option to manage hand-off can be nice but might bring about adverse results if not done correctly.
Step to adjust AiMesh’s roaming assistance
Like everything in an AiMesh system, you adjust this setting on the primary router unit. The screenshot below belongs to an RT-AX89X, but the process is the same if you use any router.
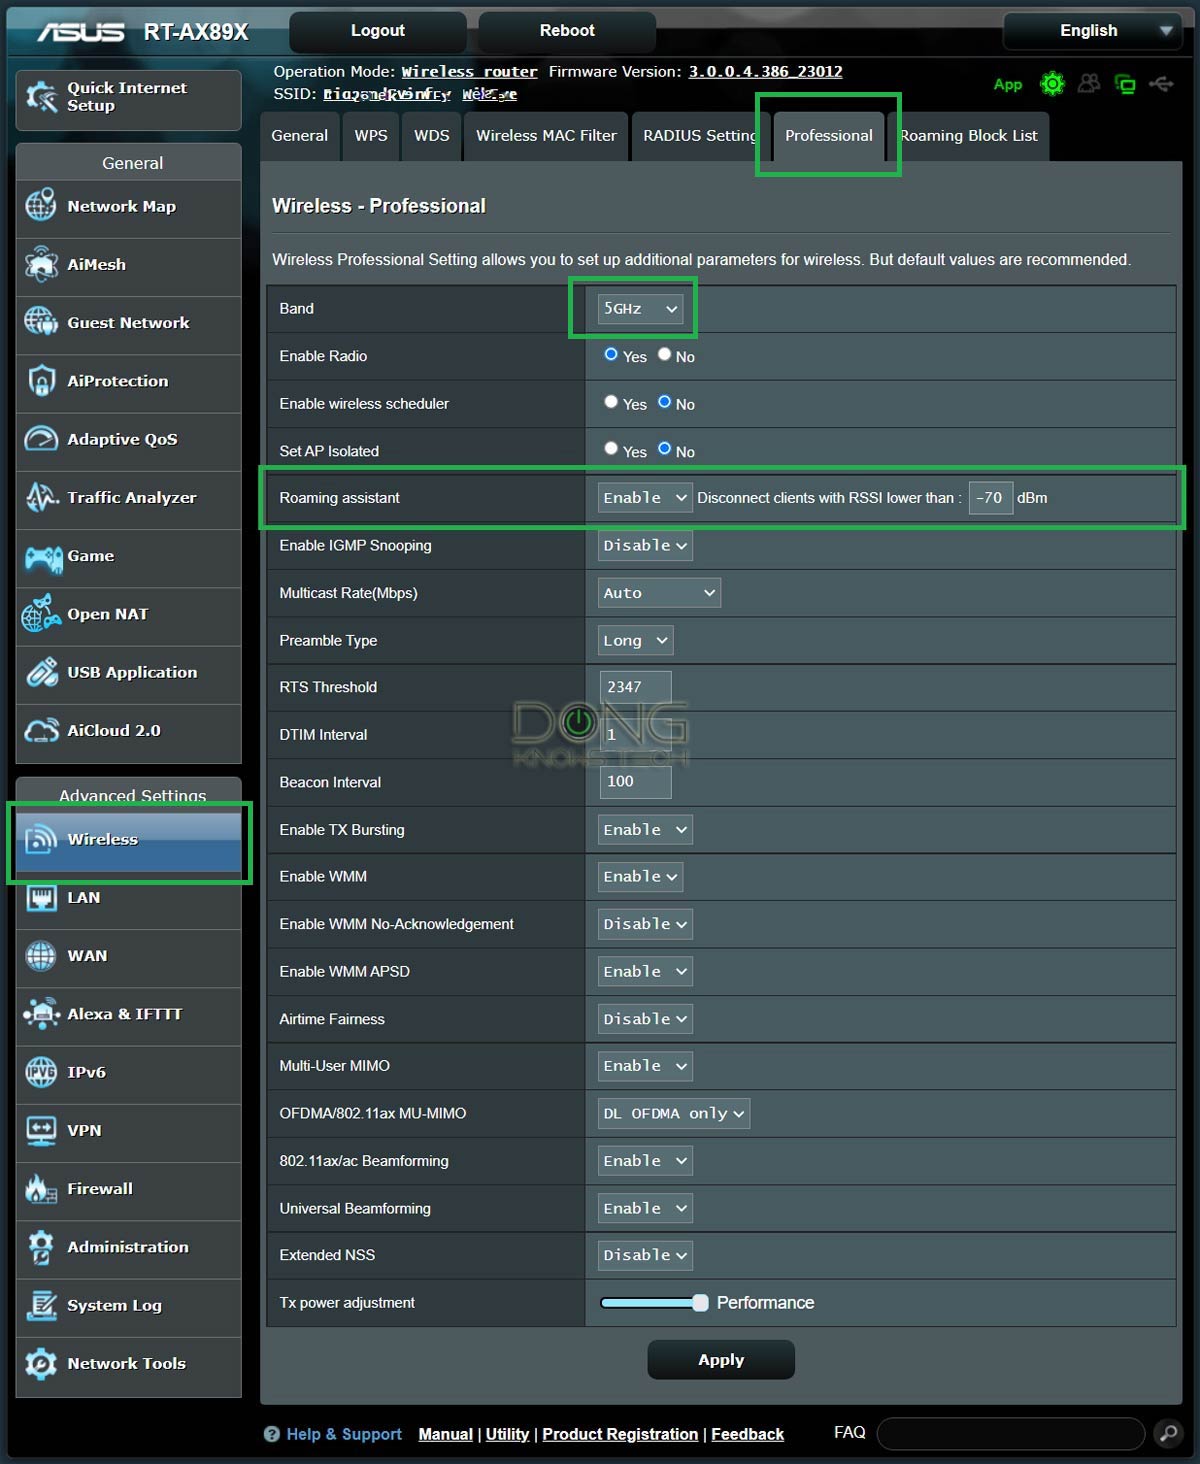
1. Log in to the primary router’s interface, navigate to the Wireless section (under Advanced Settings), then to the Professional tab.
2. Pick the band you want to customize (2.4GHz or 5GHz)
3. Locate the Roaming assistant setting; you’ll note that there’s a default value already in place, something like -70 dBm.
4. Change the value to a new number that fits your situation — more on this below.
To know what dBm number works best, you first have to understand what dBm means, and I explained separately in this post about received Wi-Fi signal strength.
However, generally, you should keep the dBm value between -60 (more sensitive, clients favor fast speed and roam faster) and -75 (less sensitive, clients tend to remain to the original broadcaster).
Important note: If you make the roaming too sensitive, a device placed right in the middle of two nodes of the same signal strength (or weakness) might have problems staying connected — it might keep jumping between the two.
5. Click on Apply. Repeat step #2 for other Wi-Fi bands when applicable. Then manually restart all hardware units.
And that’s it. Your system should deliver the best signal hand-off now.
It’s important to note that there’s no precise measurement for Wi-Fi range and signal strength since they vary greatly depending on the environment.
That said, what mentioned above are my estimates applicable to my situation. The numbers that work for you depend on your environment and the routers you use. It’s a matter of trial and error.
Also, roaming is tricky since it depends more on the clients than the router. Networking vendors can’t test their products with all existing equipment. As a result, at times, it’s a matter of luck.
One thing that almost always works: You can always turn your device’s Wi-Fi off and then back on to get it connected to the closest broadcaster.
Add device to the Roaming Blocklist
This is the opposite of the above: In many cases you want a device to remain connected to a specific node.
An example is when you have a device right in between two equally strong nodes and it keeps jumping back and forth casing necessary disconnection. Or you want to manually keep the load evenly among different nodes.
Here are the steps:
- Log into the primary router’s web interface and make sure the device is connected to the node you want. You can check on this via the AiMesh section.
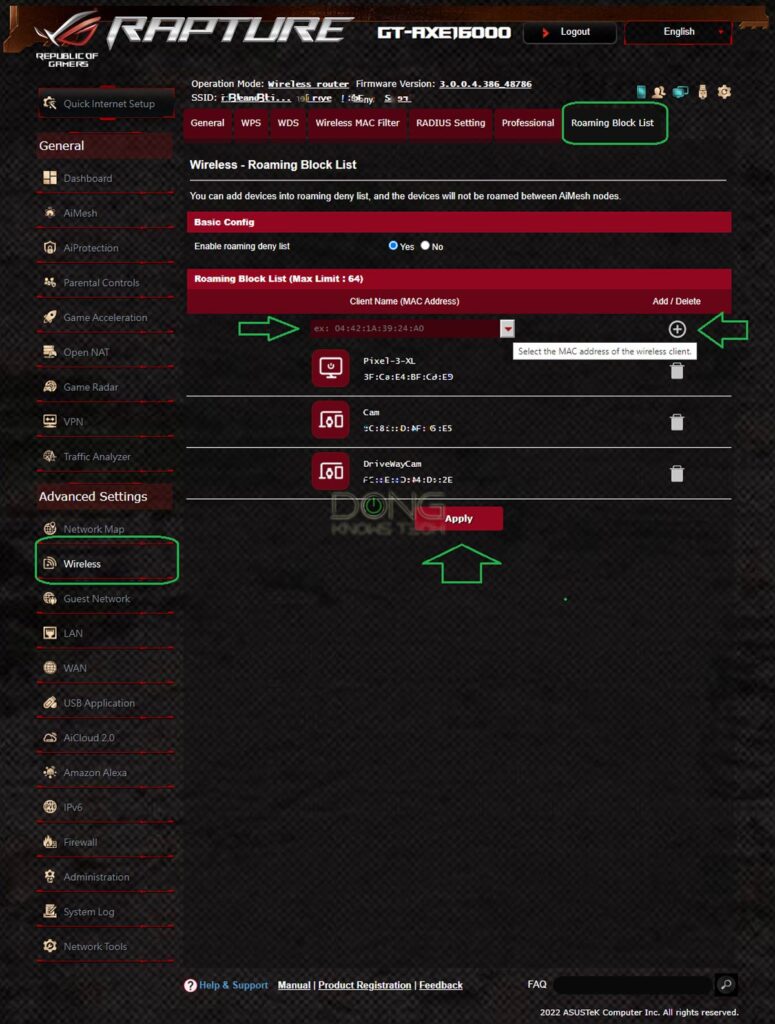
- Go to the Wireless section then click on the Roaming Block list tab
- Enter the device’s MAC address (or pick it on the list of the connected clients) and click on the Plus sign (+). Repeat to add more devices.
- Hit Apply.
And that’s it. The device will now be locked to its current Wi-Fi node. To undo this, just click on the trash icon and apply the changes.
Remove a node
If you want to remove a satellite note from the system, within the web interface, go to the Network Maps then click on the AiMesh button. Here click on the trash bin icon next to its name, as shown in the screenshots below.
That will also reset the node to factory default.
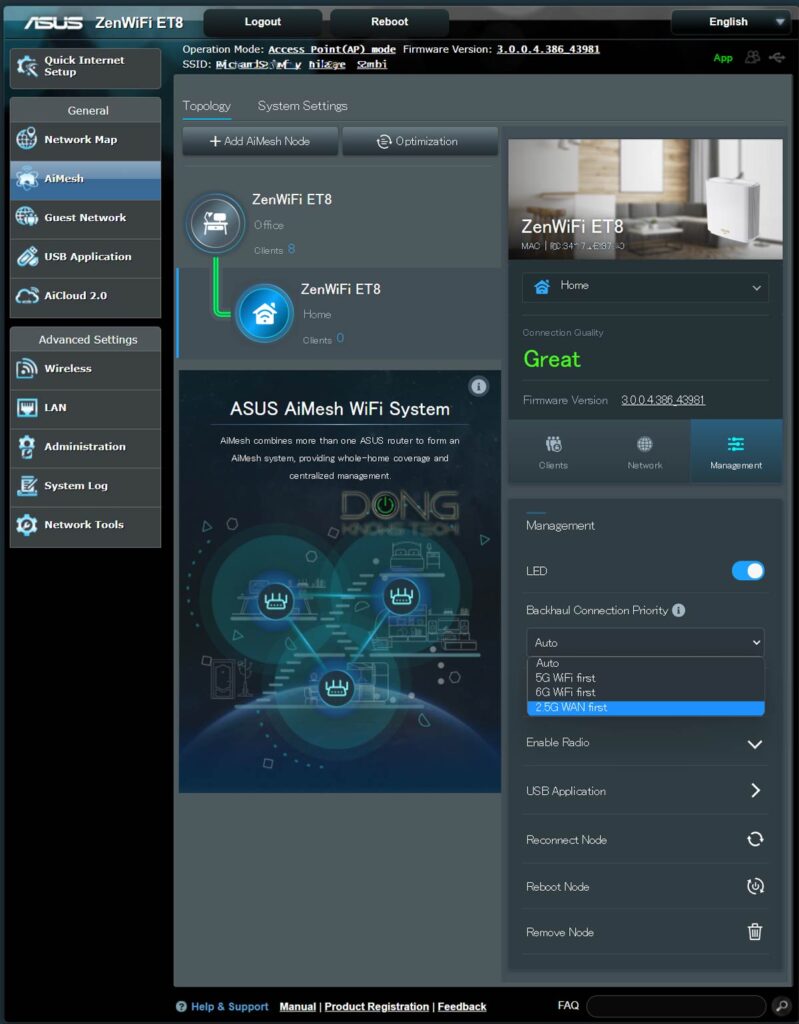
Manage a node’s backhaul and additonal settings
Each satellite node uses the Auto setting for the backhaul by default, which should work in almost all situations.
(And generally, you should use wired backhaul for dual-band hardware. I detailed that in this post on how to pick an AiMesh combo.)
However, if you use a router with a Multi-Gig LAN port and no Multi-Gig WAN port — namely the RT-AX86U and RT-AX89X — you might want to manually pick that port as the backhaul priority in a wired home. This also applies when you use a mix of wired and wireless backhauling.
To do that, go to the AiMesh section of the primary router’s web interface and change the setting accordingly. Here you can also manage a few other aspects of the satellite, including its LAN ports, LEDs, and USB ports.
Use the Ethernet Backhaul Mode (when applicable)
If you use a network cable to link the router and the satellites throughout — a pure wired backhauling setup — it’s best to explicitly choose the Ethernet Backhaul Mode.
Here are the steps:

- Log in to the router’s web interface
- Go to the AiMesh section, then to Systems Settings
- Move the slider of Ethernet Backhaul Mode (EBM) to the On position (right).
This mode allows for better performance and easier management of the system’s Wi-Fi settings. If you use Tri-band hardware, you’ll also be able to lump all bands into a single SSID known as Smart Connect.
Firmware update
The last but most important thing is to make sure all hardware units use the latest firmware.
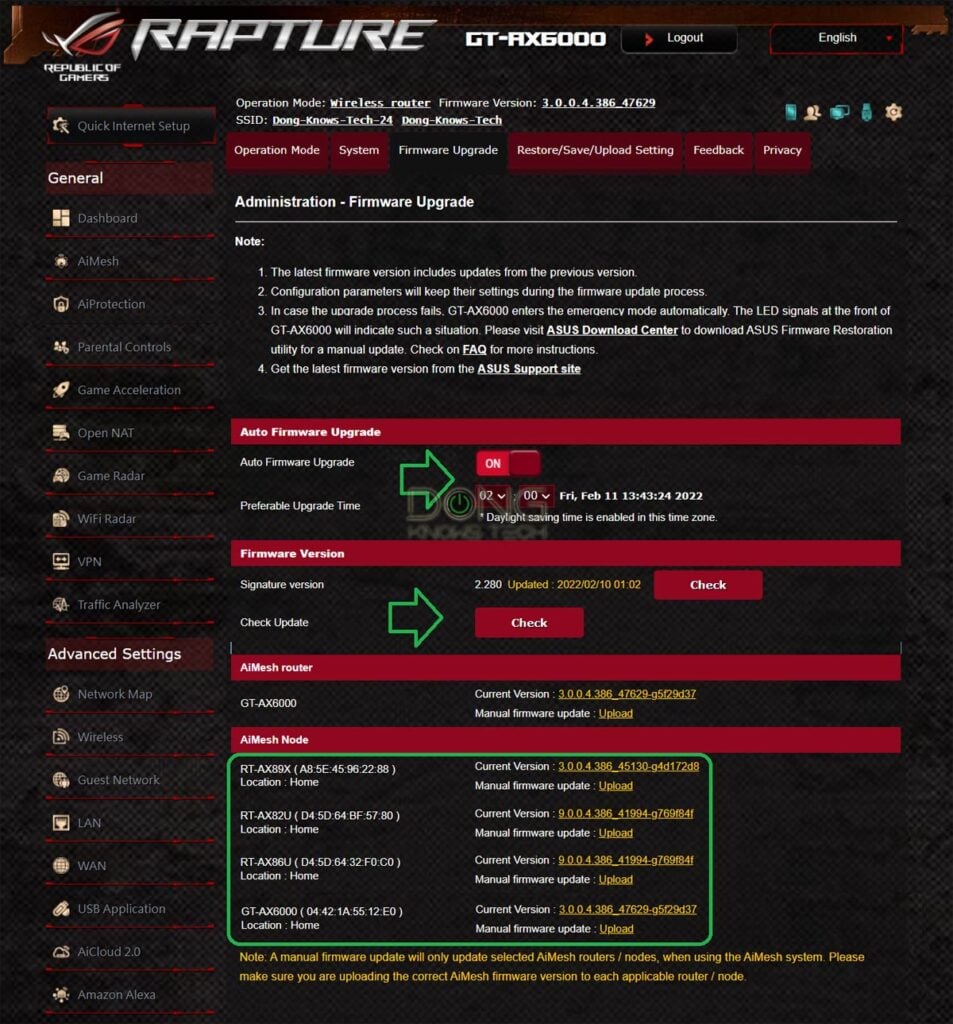
For that, go to the firmware section of the main router — you can jump directly there by clicking on the router’s firmware version. Here, you can check for new firmware, update each unit manually, or opt for auto-update — pick a time when nobody is online.
Finally, and optionally, you might want to change the roaming assistance so that the mesh network delivers the best signal hand-off.
Final thoughts
An AiMesh setup is not the easiest way to build a mesh system, compared to other canned alternatives like Orbi, TP-Link Deco, or Amazon’s eero.
However, if you get it done right, it’ll give you an excellent mesh with little or no privacy risks, and that’s a rare commodity these days.
[ad_2]
Source link


